If you plan to install a third-party antivirus, such as Norton, AVG, or Kaspersky, you might have to disable Windows Defender first. Otherwise, Windows 10 might not be able to install updates, or your virus program might not work properly. Or perhaps Windows Defender is preventing you from doing specific tasks. No matter the reason, here’s how to disable Windows Defender in Windows 10:
What is Windows Defender?
Windows Defender is pre-installed software that comes with every laptop or computer running Windows 10. It is an anti-malware program that can protect you from viruses, ransomware, and spyware. However, the program has been known to cause issues for users, especially if they install another antivirus.
How to Disable Windows Defender Temporarily
This method will allow you to disable Windows Defender temporarily. If your system is at risk, the program will turn itself back on so that it can do its job.
Go to the Windows Start Menu. This is the Windows logo by the bottom-left corner of your screen. Go to Settings. This is the gear icon just above the power button. Click Update & Security. In the sidebar, click “Windows Security.” Click “Virus & threat protection” from the right window. In the new window, click “Manage settings.” You will see this under “Virus & threat protection.” Turn the toggle off under “Real-time protection.” How to Disable Windows Defender Permanently
A more permanent solution involved editing your computer’s registry. Follow the steps below:
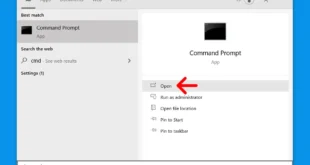
Click the Windows key + R. This will open the Run Command Box. Type “regedit” in the search bar and click OK. Click “Yes” when a pop-up window asks if you want to allow the app to make changes to your device. In the top window search bar, paste the following:
HKEY_LOCAL_MACHINESOFTWAREPoliciesMicrosoftWindows Defender
Hit enter on your keyboard. Right-click on the Windows Defender folder in the sidebar. Select “New” from the drop-down menu. Select “DWORD (32-bit) Value” from the options given. A file will appear in the right window. Right-click the “New Value #1” file and select “Rename.” Rename it “DisableAntiSpyware.” Double click the DisableAntiSpyware DWORD file. Change the value data in the pop-up window from 0 to 1. Click OK. Restart your computer. The changes will not be in effect until you restart the computer.
If you want to enable Windows Defender in the future, you can redo the previous steps, but set the value data of the DisableAntiSpyware to 0. If you do not see this file, you can create a new one and set the value data of that new file to 0.
After you disable Windows Defender, make sure to install a new anti-malware software right away. If, for some reason, your computer gets infected by a malware, make sure to check out our guide on how to remove malware from Windows 10.